Anyone who draws or paints, and owns a pet will at some point want to paint them, after all, they are our constant companions and models, inspiring us with their characteristics and quirky little habits.
Our pets become one of the family, they are all individual
with their own personalities, we, as their owners know all their little foibles
so we are in the best position to sketch them accurately.
I hope to inspire you to interpret the best
characteristics of your pet, rather than attempting to create a pet portrait.
Pet portraits are usually fairly detailed and require photos to work from. Our
sketches will instead require our models.
Tip – You can use photos if you wish, if you do,
place them at arms length propped up against something so when you refer to
them it is as if you are looking at the animal from a distance. Avoid
meticulously copying the photos; otherwise all spontaneity may be lost.
Lets create some dynamic sketches,with ideas for you to
build up a series of images which in time will perhaps build up to a journal
about your pet.
We are going to begin with contour drawings. This in my
experience is the quickest, easiest approach to drawing live animals.
Firstly, it is vital that you choose a time when your pet is
resting, or calm. Perhaps curled up in a favourite chair, in front of the fire,
on a windowsill or asleep in its basket. This will ensure that you have plenty
of time to observe without it moving as well as you both being still and quiet.
This is the perfect start.

Resting ‘Smudge’ 6 x 12cms
A4 smooth drawing pad 120gms
Pencil, biro or felt tip pen
How to Contour Draw
Hold the pencil as if you were going to write your name, you
may lean lightly on the paper but try to avoid firmly placing your fist onto it
or this will restrict your movement.
Begin anywhere you wish, but once you begin try not to lift
your pencil too much. Imagine it is fixed to the paper, look at your subject,
then look down onto your then move the pencil slowly, look up again, then move
the pencil slowly, look at the shapes, don’t bother with the details, notice
however the direction of the fur, each time you stop, look up. Draw exactly
what you see not what you think you see.
Tip – You should spend more time looking and less
time making the line. Spend more time thinking and less time drawing.
The result will be a strange little drawing that may also be
an odd shape. This is because you have been concentrating on the subject alone.
I am often asked, where to end a drawing, what to include
and how I decide what background I need.
I like to include the surroundings, as it places the subject and makes it more relevant, it can also suggest a
story.

Instead of just drawing my cat, I have
drawn my cat, sitting on a table in front of a window, which has horizontal
blinds. The cat could be watching something outside or indeed have nodded off.
Unlike the first drawing,
purely of the cat, this drawing is much more interesting by including
surroundings. I didn’t need to include the whole table, or indeed the whole
window; I only need to include enough to set the scene. Remember your subject
is the animal; the surroundings are like stage props.
‘Smudge’ on the table 18 x 24 cms
Smudge often sits looking out of the window and nods off, so
it’s an ideal position to draw her. She is often there for quite some time, so
I know I will have a chance to do one, perhaps two drawings.
Using Colour
A4 smooth drawing pad 120gms
Coloursoft Drawing Pencils
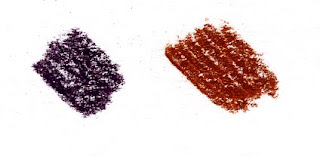
Blackberry 280
Dark Terracotta 610
The next step is to introduce colour. Drawing with colour
can be very exciting, especially if you usually use graphite and are used to
black and white tonal drawings. Colours add another dimension to a drawing,
which is surprisingly quick and effective.
The trick is to use a very limited choice of colours,
otherwise you spend more time choosing and trying out colours than actually
doing the drawing, which often leads to a disappearing subject!

For this drawing I used just two colours. I did the main
contour drawing using Dark Terracotta, using exactly the same techniques as if
I were using a pencil, and then I added more markings using Blackberry.
Once complete, I held the pencil flat against the paper so
as to use the length of the colour, quickly blending the pigment against the
paper, this gave a textured appearance similar to fur. I then added more dark
and the whole drawing took about 3 minutes.
Of course it may take you a little longer, but try not to
labour over it. Have both pencils at the ready and just go for it! Once this is
achieved the next stage can be done even if the animal moves.

Tabby in Laundry basket 11 x 14 cms Colouring Pencil Drawing
Any tonal contrasts and firming up of lines can be done once
the main elements are achieved.
The difference made by just darkening the background is
considerable, but unnecessary when the cat is in position, if it moves slightly
or even walks off, I can still add the darks and strengthen my drawing.
The important thing is not to overwork it, keep to the
original, but improve rather than alter it.
Seeing blocks of colour and tone.
Once you have had a few goes at contour drawing you are then
ready to move onto looking for blocks or shapes of colour. Again it might be
easier for you to think of these shapes like jigsaw pieces.

For this Demonstration I used pastel pencils.

Use whatever pastel pencils, colouring pencils or indeed
graphite pencils you have, choose three different tones. Light medium and dark.
I chose one dark, one light and two mediums. This gave me a little more choice
of colours.
This drawing was done at the same time as the line drawing at the top of this post.
I can either use my original contour drawing as a guide, or
begin my second drawing and if the cat moves, complete it using my contour
drawing as reference.
I used a combination of all three pastel pencils and, using
the side of the pencil blocked in colour. I did this fairly quickly; I don’t
worry about details but just look at the darks and lights.
Tip – A good idea is to screw your eyes up so they are just
little slits, then look at your subject, you will see blocks of tone much
easier as all of the details disappear.


Using Oil Pastels (or powder pastels)
Lets now go a bit bonkers with colour!
Using my forefinger, and small circular movements, I smudge
the entire cat. This leaves a suggestion of texture but flattens the shape.
This is good, it gets rid of all that white paper, so I am now ready to block
in the dark background. This will automatically suggest light on the cat! How
easy it that! Use whatever is there to create the background, avoid ‘making it
up’ which rarely looks convincing and often looks like an after thought.
Notice how quickly and loosely I add the dark. I don’t have time to spend time colouring it
in nicely, my subject may wake up!
Pastel ‘Smudge’ 19 x 25 cms Pastel Drawing
I continue by suggesting a window shape, this need only be a
tiny corner but it is enough to create a light source. I don’t need to include
the blinds.
I now hold the dark pastel pencil as if I was writing and
begin to add the darker tone on the body of the cat with bold scribbly marks.
This suggests fur and texture and is really all I need to portray Smudge
accurately.
The drawing is exactly what I wanted, simple yet
descriptive, the key to a quick atmospheric animal drawing.
Using Oil Pastels (or powder pastels)
Lets now go a bit bonkers with colour!

Marmalade 20 x 25 cms
I began this quick drawing with a contour in pencil, then
chose just three colours.
A4 smooth drawing pad 120gms
Inscribe pastels
522 Pale Ochre
509 Orange
535 Light Blue
I avoided the white paper where the cat is white, but
applied Pale Ochre to all other light areas using the side of the stick. By
applying an even pressure with the side of the pastel stick I can suggest bold
blocks of textured colour with little effort.
Tip -Texture has a lot to do with the paper surface;
the smoother the paper the finer the texture is achieved.
Next, using the same technique I added the Orange. I applied
fluid broad strokes, occasionally overlapping the previous colour.
Using Light Blue I pressed the end of the pastel stick
firmly onto the paper blocking in strong colour to suggest the cushion.
Finally I added a little of the blue to the darker sections
of the ears.
I really like this little drawing; I enjoy using bright
colours and emphasising the shapes and pattern within a subject.
I hope you will have had a go at similar projects
Good luck with your drawing
No comments:
Post a Comment